
How to Create a Virtual Tour from Existing 360° Photos
You can create a virtual tour from existing 360° photos without returning to the location if your files are complete spherical panoramas and cover the route you want visitors to explore. Check the images, upload them to 360are, connect the viewpoints, and publish a tour people can open in a browser.
The important starting point is the image file, not its camera brand. This workflow can use compatible exports from a 360 camera or a stitched photographic panorama. It does not automatically import another platform’s scene connections, branding, or floor plans.
Find originals → Check projection and quality → Upload → Rebuild navigation → Preview → Publish
Step 1: Find the Original Panorama Files
Collect the highest-quality files you have and keep an untouched backup. Group working copies by property and capture date. Choose images you have permission to reuse and publish.
| What you have | What to do next |
|---|---|
| Complete 2:1 equirectangular JPEG or PNG | Check dimensions, sharpness, and full-scene coverage. |
| Camera-native files such as INSP or DNG | Process and stitch with compatible software, then export JPEG or PNG. |
| Dual-fisheye images | Stitch into a complete sphere before uploading. |
| Cubemap faces or tiles from another viewer | Obtain the original panorama or convert the complete source with suitable software. The image uploader expects a single equirectangular file. |
| A hosted tour URL or iframe | Request or export the original image files using that service’s supported options. A tour link is not an image upload. |
| A screenshot, Tiny Planet, or cropped view | Retrieve the full spherical original; resizing the crop cannot restore missing views. |
For camera-specific preparation, use the Insta360 capture and export guide or RICOH THETA virtual-tour guide.
If moving from another service, check which originals it allows you to download and any applicable usage rights. Do not assume 360are can reconstruct a complete project from a public link. Scene names, navigation, hotspots, and other settings may need to be recreated manually.
Step 2: Check Projection, Format, and Dimensions
An equirectangular image represents the full sphere as a flat rectangle. Its width is twice its height, and the top and bottom may look stretched in an ordinary photo viewer. Read Equirectangular Images Explained if you are unsure what you have.
360are’s supported image requirements are:
| Requirement | Value |
|---|---|
| Upload file | JPEG or PNG |
| Projection | Full spherical equirectangular |
| Aspect ratio | 2:1 |
| Minimum dimensions | 4,096 × 2,048 pixels |
| Recommended dimensions | 8,192 × 4,096 pixels or higher |
| Maximum dimensions | 16,384 × 8,192 pixels |
Follow any file-size limit shown in the uploader. If a larger source needs resizing, keep the ratio and preserve the entire image. Avoid unnecessary repeated JPEG saves.
A 2:1 rectangle alone is not proof of a 360 photo. A cropped landscape or ordinary phone panorama can have that shape while missing the ceiling, floor, or much of the surrounding view. Do not stretch it to fit or invent missing property details. Retrieve the full original or arrange another capture when necessary.
Step 3: Audit Quality and Coverage
Inspect one panorama in a 360 viewer before committing to the full set. Then check every selected image for:
- Sharpness and readable detail at a normal viewing angle.
- A level horizon and acceptable seams.
- Consistent exposure and color between connected scenes.
- Reflections, people, or personal details that need review before publication.
- Accurate, current presentation of the space.
Choose the clearest image for each viewpoint and remove near-duplicates from the working selection. If photos were taken on different dates, check that the rooms and connections still match; do not combine incompatible layouts into an apparently continuous current tour.
Sketch a route such as Entry → Living Room → Kitchen, with branches for bedrooms and outdoor areas. If you lack a hallway view, avoid a misleading transition through a wall. Use a clearly labeled destination or obtain the missing panorama. For additional capture, the 360 camera guide compares equipment and export workflows.
Step 4: Upload One Image, Then the Rest
- Sign in to 360are and open Asset Upload.
- Select one prepared JPEG or PNG and wait until processing completes.
- Open it from All Assets and look all the way around, up, and down.
- If the projection and quality are correct, upload the remaining files.
- Give them clear room names so you can identify destinations while editing.
Testing one image first is particularly useful with older exports or files from an unfamiliar camera. Consult the upload guide if a file fails rather than repeatedly uploading the same unsupported source.
Step 5: Assemble and Connect the Scenes
Open VR Tour Editor, select + Add Assets, and choose the panoramas. Arrange the intended entry panorama first. A filename list or thumbnail order does not automatically create room-to-room connections.
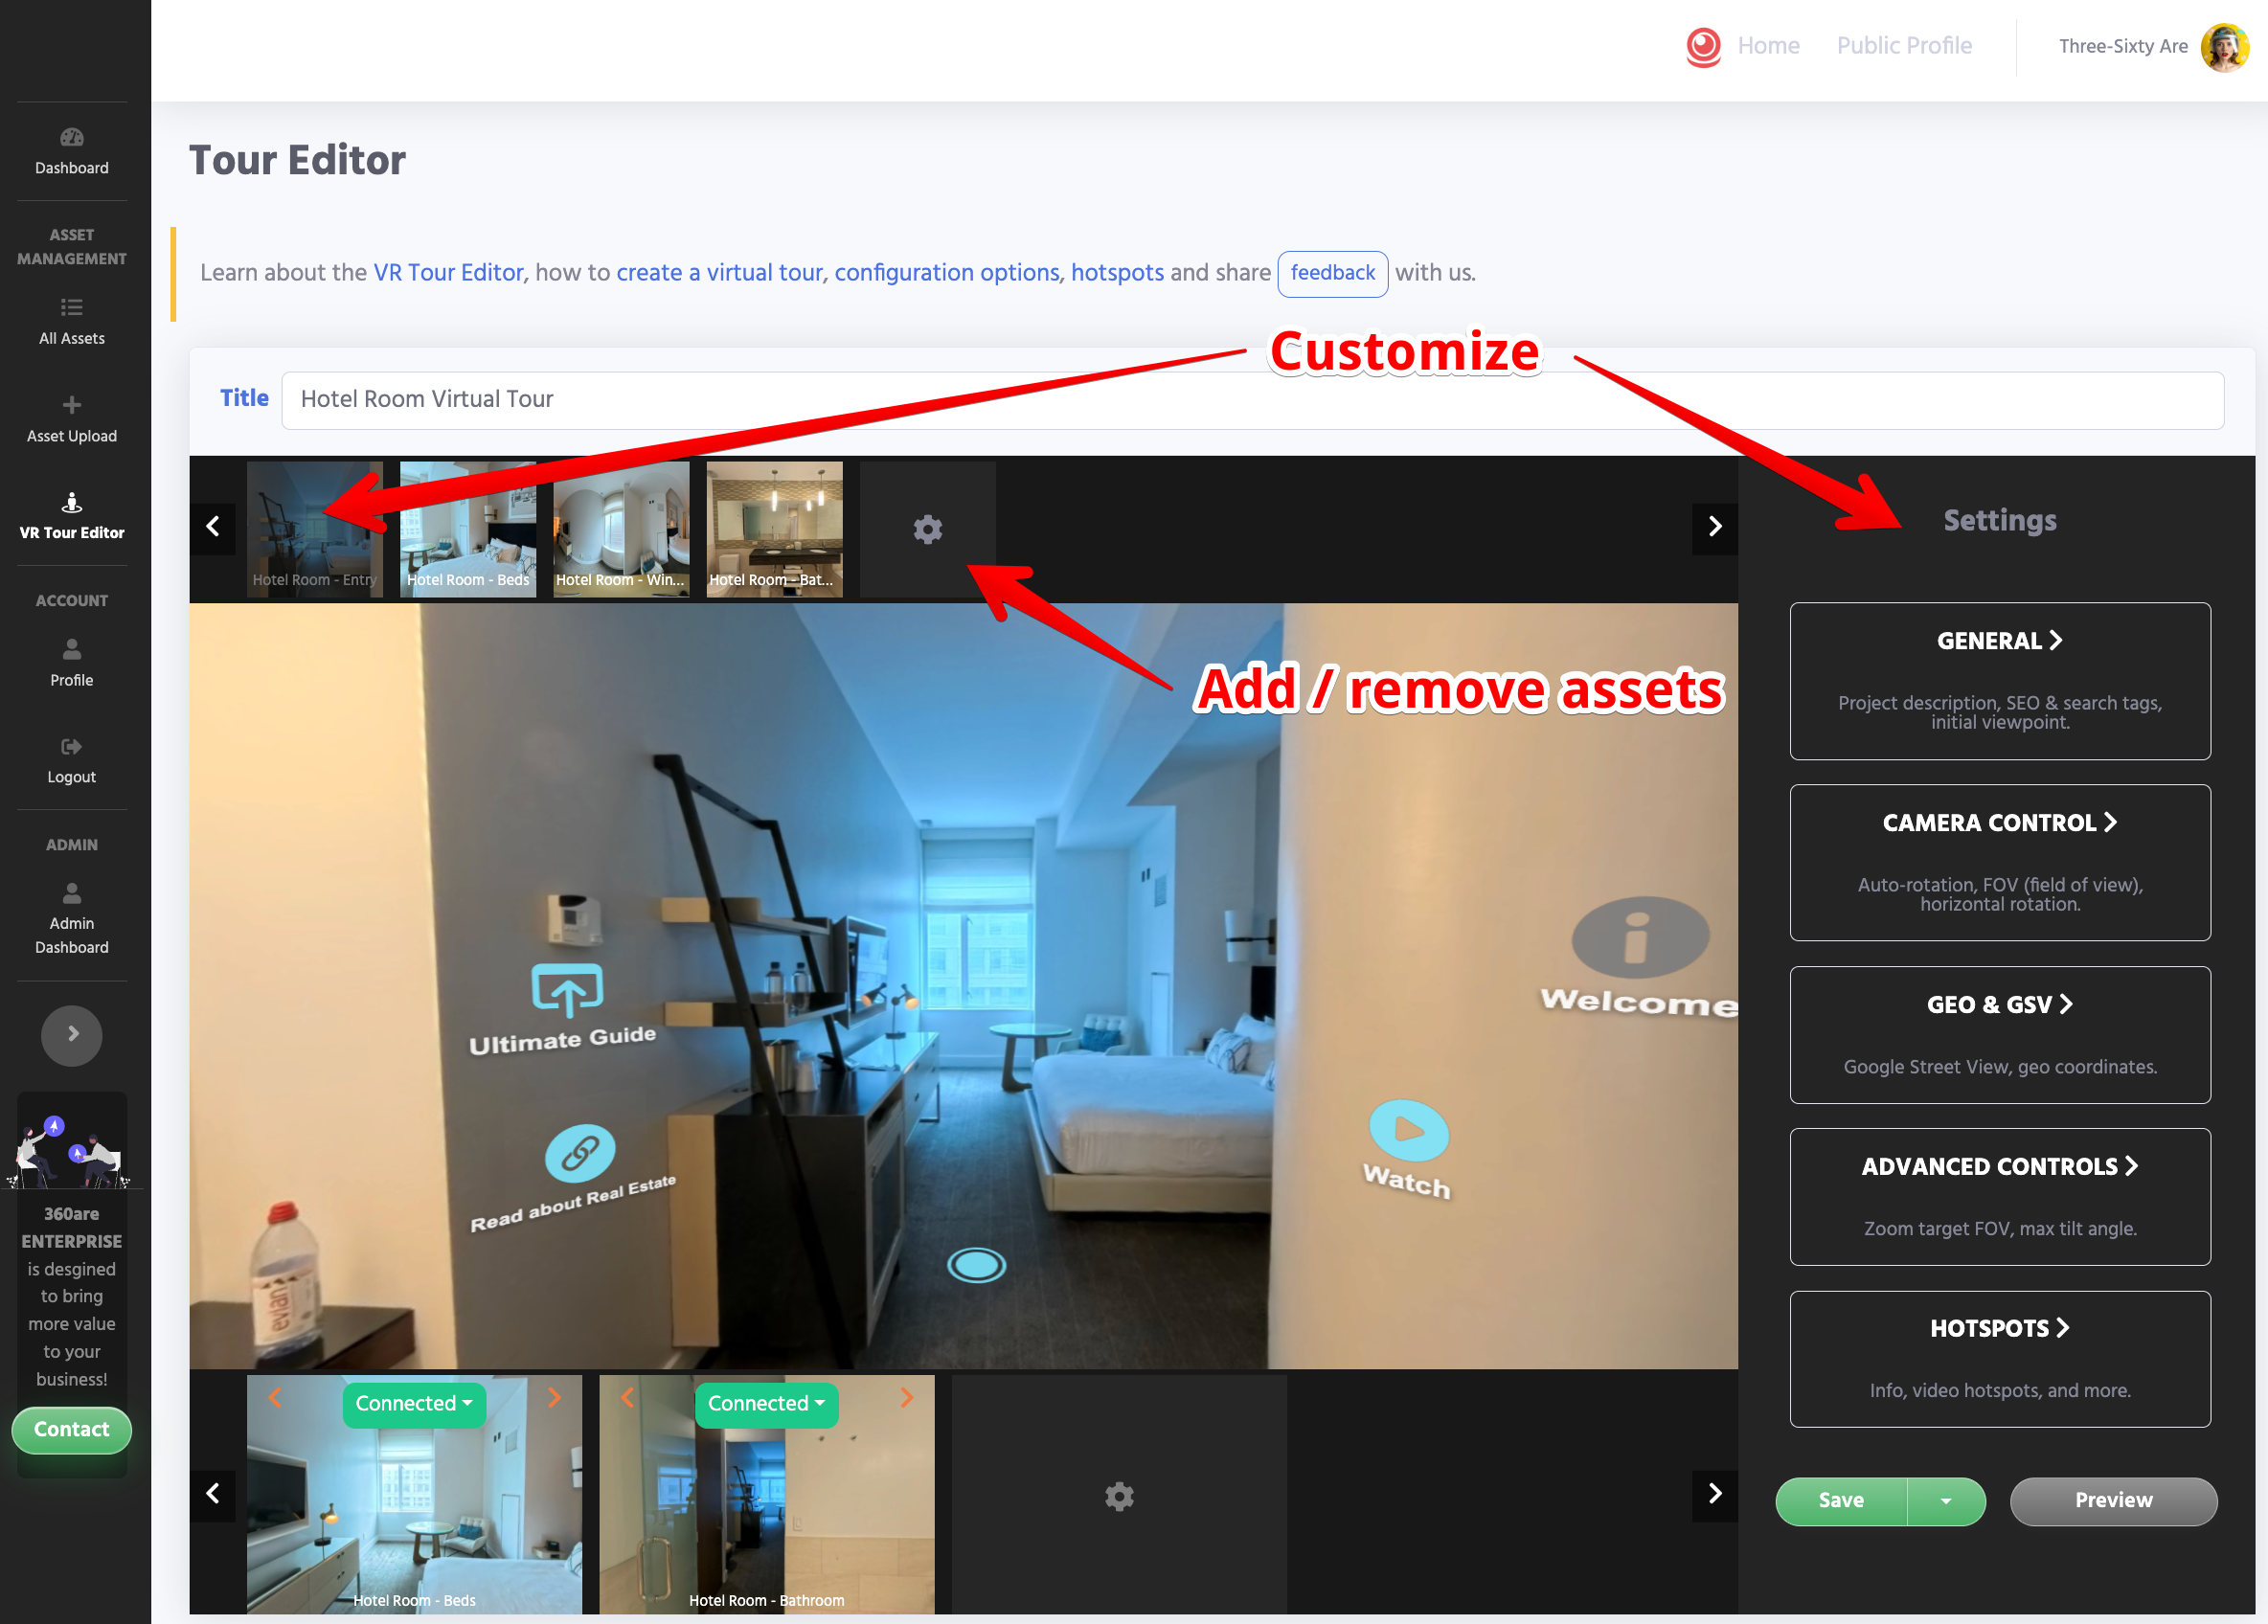
For each connection:
- Open the starting scene and select + Add Transition Scene & Hotspot.
- Select the destination panorama and align the scenes to face the same direction.
- Choose Disconnected → Add Hotspot, pick an icon and optional label, and select Place Hotspot.
- Place it toward the destination or use a clear label when the destination is not directly visible.
- Preview the move, check the landing direction, and make sure the visitor can return.
Make every intended room reachable from the entry. Set the initial viewpoint and a useful thumbnail, then save. The tour editor tutorial shows these controls in detail.
Step 6: Restore Useful Context with Hotspots
Old photos may arrive with no descriptions. Add short, verified information rather than assuming viewers will identify every feature. Use navigation hotspots for movement and information hotspots for explanatory text, supported video, or other relevant content.
For example, a gallery panorama could link to the next room and separately explain the exhibit currently visible. Avoid adding claims about features or conditions you cannot verify from the source material. Review the hotspot types and setup, then test each popup and destination.
Step 7: Add an Existing Floor Plan
An interactive floor plan can make a recovered collection easier to navigate. On BUSINESS, open Settings → Advanced Controls → Interactive Floor Map → Open Floor Map Editor. Upload your drawing, place the scene markers at the correct capture positions, adjust directions, apply, and save.
Use a plan that matches the photographs. A marker should represent the viewpoint, not simply the middle of a room. Check that every marker opens the expected scene.
360are uses the floor-plan image you provide; it does not automatically generate a measured plan or 3D dollhouse from these photos. Follow the interactive floor-plan guide.
Step 8: Enable AI Chat Where Useful
Prepare factual project and scene descriptions before enabling AI guidance. With older imagery, confirm changeable details with the property owner rather than asking AI to infer current amenities, opening hours, or availability.
In configuration, find General → Enable AI Chat and use Validate AI Readiness if available. Save and test likely visitor questions. Correct unclear descriptions and verify any suggested navigation. Keep normal hotspot navigation available.
AI Chat is included with BUSINESS or available as a PLUS add-on, with usage allowances and additional charges. See AI Chat setup and usage.
Step 9: Publish and Share
Before delivery, preview the full route on desktop and mobile. Check entry view, return paths, floor-plan markers, labels, and any external content. Confirm that the tour represents the location as you intend it to be presented.
FREE supports building and previewing draft tours. Publishing a complete multi-scene tour requires PLUS or BUSINESS. Interactive floor plans require BUSINESS. Compare 360are pricing and plan features when deciding which presentation you need.
After publishing, open the tour in its own tab and choose Share. Copy the Tour Link for messages or email, or Embed Code for a website that supports iframes. Test the visitor-facing result while signed out. Copying a draft’s link does not publish it.
For BUSINESS MLS delivery, use the dedicated Copy MLS Link and check the receiving MLS’s requirements. See share and embed instructions and branded and unbranded delivery.
Can Existing Photos Be Published to Google Street View?
Eligible individual panoramas can be published through 360are on PLUS or BUSINESS. Check that the image and location are suitable for public publication and that you have permission to publish. Older files may lack accurate location information; verify coordinates and orientation rather than guessing.
Connect your Google account, publish the individual panorama, and inspect its status and Google result. A connected tour hosted on 360are does not automatically become a connected Street View tour. Do not promise transfer of room connections, information hotspots, floor plans, or AI Chat. Follow the current Street View publishing guide for individual-panorama controls and limits.
Troubleshooting Existing Image Collections
| Problem | Practical next step |
|---|---|
| Only a hosted URL is available | Ask for the original image files or use the original platform’s supported export. |
| Image dimensions fit but the view is distorted | Confirm it is a complete equirectangular sphere, not a crop or fisheye source. |
| The panorama looks soft | Find a higher-quality original; enlargement and sharpening cannot restore missing detail. |
| Adjacent scenes have different layouts | Use a consistent capture set or clearly present separate areas rather than implying continuity. |
| A room has no return path | Add or repair the reverse scene connection and preview from the entry. |
| The shared tour is unavailable | Check publishing status and plan, then test the actual copied link while signed out. |
Frequently Asked Questions
Do I need a 360 camera if I already have the photos?
No. You can build the tour from compatible files without owning the camera that captured them. You may need another capture if a room or connecting viewpoint is missing.
Can I mix panoramas from different cameras?
Yes, if each image meets the upload requirements. Match orientation and appearance as closely as practical, and check that the images show a consistent layout and capture period.
Can I convert ordinary photos into a complete property tour?
Ordinary single-view photos do not contain the full sphere required by this workflow. A suitable set captured for panorama stitching can be processed in separate software. Resizing one ordinary photo cannot recover views that were never captured.
Can I import another platform’s complete tour?
This guide covers uploading image files and rebuilding the tour. It does not establish automatic import of another platform’s project, scene connections, hotspots, or settings. Obtain supported originals and recreate the navigation.
Can I make a virtual tour from one panorama?
One panorama lets visitors look around one viewpoint. To move between distinct rooms or viewpoints, you need multiple panoramas and connections between them.
Can I build a tour from existing photos for free?
Yes, as a draft you can build and preview. Public publishing of the complete multi-scene tour requires PLUS or BUSINESS. Free panorama sharing is a separate feature.
Turn Your Existing 360° Photos into a Tour
Choose three connected viewpoints and test one original file. If you are deciding where to host them, read the virtual tour software comparison, then compare 360are plans.
Create your first tour free in 360are to upload your prepared photos and build a draft before choosing a publishing plan.