
Tour and Panorama Configuration Options
This guide explains the main configuration options available in 360are for both single panoramas and virtual tours.
These settings help you control how your panorama or tour appears to visitors, how it behaves when opened, how it can be found through search, and how it can be saved or published.
Some options are shared by both single panoramas and virtual tours. A few options are available only for virtual tours, single panorama settings, or paid plans.
Opening Configuration Options
You can access configuration options by clicking the title of a virtual tour or single panorama from the All Assets or Dashboard pages.
You can also open configuration options from the asset drop-down menu on the All Assets page:
- Edit VR Tour opens the virtual tour editor.
- Edit Settings opens the single panorama settings page.
The settings are grouped into these sections:
- General
- Camera Control
- Geo & GSV
- Advanced Controls
- Hotspots
- Save, Preview, and Publishing Options
General
The General section contains the most commonly used settings. These options help describe your project, prepare it for search, control the first view visitors see, and generate a thumbnail.
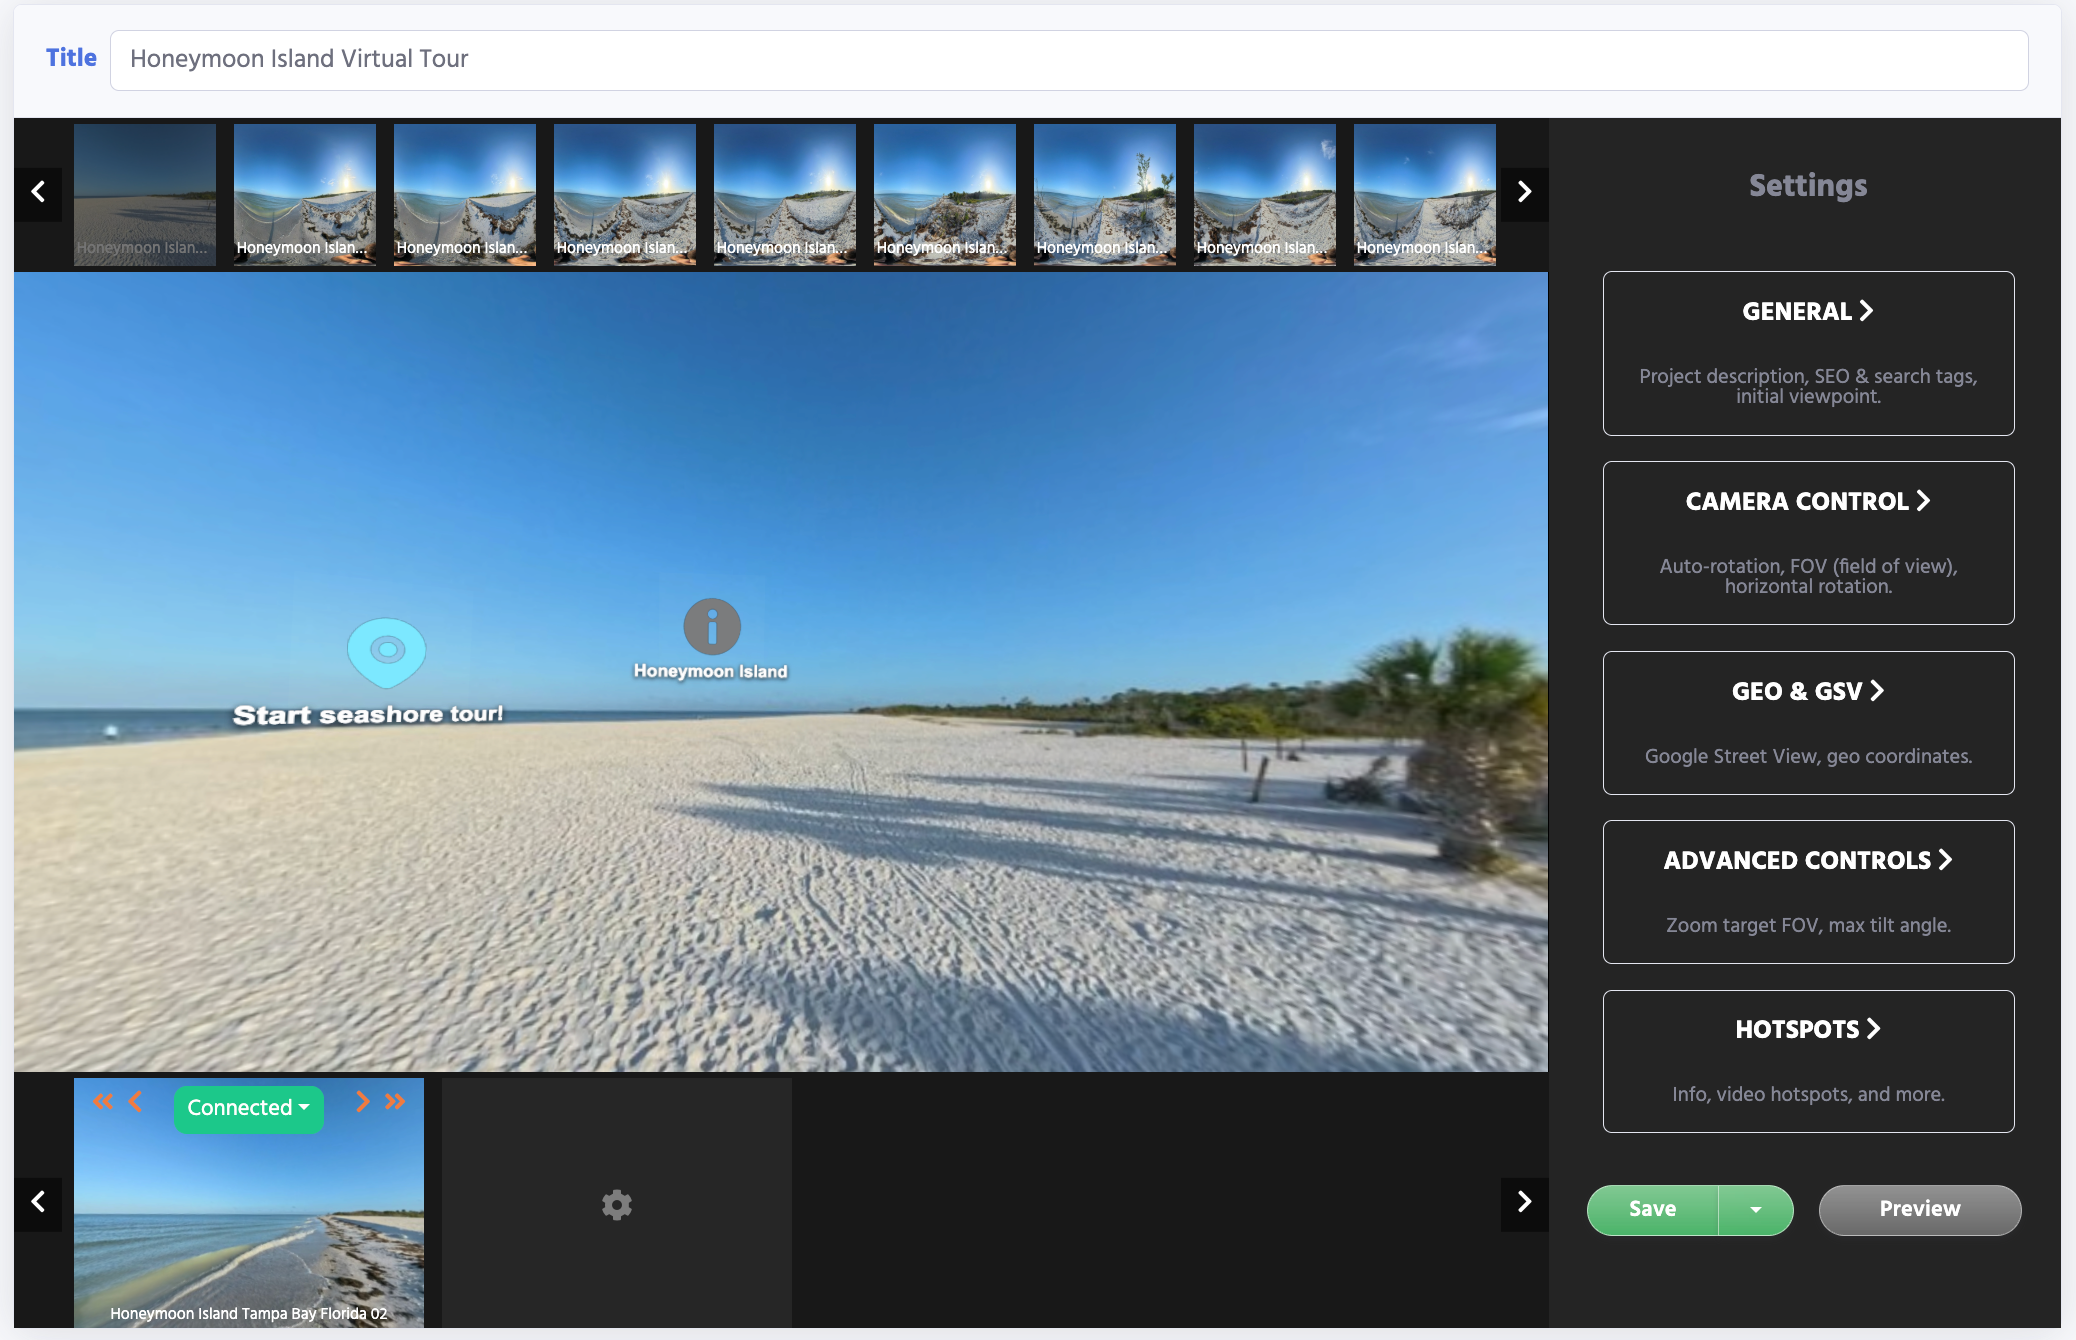
Project Description
Use Project Description to describe your panorama or virtual tour.
A good description helps visitors understand what they are viewing. It can also help with search visibility when your content is public.
Good descriptions are clear, specific, and useful.
Examples:
- “A 360° virtual tour of a modern apartment with living room, kitchen, bedroom, and balcony views.”
- “Panoramic view of a hotel lobby and reception area.”
- “Interactive walkthrough of a real estate property in Tampa Bay.”
For best results, describe the location, space, purpose, and important details.
SEO / Search Tags
Use SEO/Search Tags to add keywords that describe the panorama or tour.
Tags help organize your content and make it easier to find. Tags are useful descriptive labels; adding more keywords does not guarantee search rankings.
Examples:
- real estate
- apartment
- hotel
- restaurant
- showroom
- school
- office
- museum
- beach house
- Tampa
- Florida
Use short, meaningful tags. Avoid unrelated keywords.
Set Initial Viewpoint
Use Set Initial Viewpoint to choose the first camera angle visitors see when the panorama or tour opens.
To set the initial viewpoint:
- Open the panorama or first tour scene in the editor.
- Drag the view until it is facing the direction you want visitors to see first.
- Go to General settings.
- Click Set Current View.
This is useful when you want visitors to start by facing an entrance, main room, product display, scenic view, or other important area.
For virtual tours, the initial viewpoint is especially important because it sets the first impression before visitors start navigating between scenes.
Generate Thumbnail
Use Generate Thumbnail to create a thumbnail image from the current view.
To generate a thumbnail:
- Open the panorama or tour scene in the editor.
- Move the view to the angle you want to use as the thumbnail.
- Go to General settings.
- Click Generate Image.
A good thumbnail should clearly represent the space. Choose a clean view with good lighting and a recognizable subject.
The thumbnail may appear in asset lists, profile pages, tour previews, or other places where your panorama or tour is displayed.
Scene Navigation
Available for virtual tours.
Use Scene Navigation to show a thumbnail drawer on public virtual tours. This allows visitors to jump between scenes without only relying on transition hotspots.
Scene Navigation includes two options:
Enabled
Turns scene navigation on or off.
When enabled, visitors can see scene thumbnails and move directly to another scene.
Show on Load
Controls whether scene navigation is open automatically when the tour first loads.
Use Show on Load when you want visitors to immediately understand that the tour has multiple scenes.
Use it carefully if you prefer a cleaner first view with less interface visible.
Enable AI Chat
Included with BUSINESS; optional AI Chat add-on for PLUS. See current pricing and usage allowances.
Use Enable AI Chat to add AI Chat to the panorama or tour page.
AI Chat can help visitors ask questions and receive guidance about the space. For best results, your project should include a clear title, useful description, relevant tags, and geo information when available.
The settings panel may include Validate AI Readiness to help check whether your project has enough useful information for AI Chat.
For best AI Chat results:
- Use a descriptive title.
- Add a helpful project description.
- Add meaningful SEO/search tags.
- Add location information when relevant.
- Add useful scene descriptions and hotspot content when available.
For a focused setup checklist and troubleshooting, see AI Chat for Virtual Tours: Setup and Usage.
Camera Control
The Camera Control section controls how the viewer behaves when visitors open and interact with the panorama or tour.
Enable Auto-Rotation
Use Enable Auto-Rotation to automatically rotate the panorama horizontally.
Auto-rotation can help visitors notice that the image is interactive. It is especially useful on public pages where visitors may not immediately realize they can drag the view.
Turn auto-rotation off if you want the view to stay still until the visitor interacts.
Auto-Rotate Delay
Use Auto-Rotate Delay to control how many seconds the viewer waits before auto-rotation starts.
A short delay starts movement quickly. A longer delay gives visitors more time to look around before the panorama begins rotating.
Typical values:
- 3–5 seconds: starts quickly
- 10–15 seconds: balanced default
- 20+ seconds: waits longer before moving
Field of View
Use Field of View (FOV) to control how wide or narrow the view appears.
A lower FOV feels more zoomed in. A higher FOV shows more of the scene at once.
Typical range:
- 50: narrower, more zoomed-in view
- 75: balanced default
- 90: wider view
Use a wider FOV for small rooms where visitors need to see more of the space. Use a narrower FOV when you want a more focused, less distorted view.
Pitch / Tilt
Use Pitch / Tilt (X-Axis) to adjust the view up or down.
This can help align the panorama if the horizon feels too high or too low.
Pitch is useful when:
- The camera was slightly tilted during capture.
- The scene opens looking too far up or down.
- The vertical balance of the image feels incorrect.
Roll
Use Roll (Z-Axis) to rotate the view clockwise or counter-clockwise.
This can help straighten a slanted horizon.
Roll is useful when:
- The panorama appears tilted.
- Walls or horizon lines look slanted.
- The camera was not level when the image was captured.
Use small adjustments and preview the result.
Geo & GSV
The Geo & GSV section contains location-related settings and Google Street View options.
Latitude
Use Latitude to add the geographic latitude coordinate for the panorama or tour.
Latitude helps identify where the content was captured.
Example:
28.0836
Use accurate coordinates when the location matters for search, maps, Google Street View, or AI Chat.
Longitude
Use Longitude to add the geographic longitude coordinate for the panorama or tour.
Example:
-82.7637
Use both latitude and longitude together for best results.
Google Street View
Available from single panorama settings. PLUS+ feature.
Use Google Street View options to connect a Google account and publish a panorama to Google Street View.
Available actions may include:
- Connect Google Account
- Connect / Reconnect Google Account
- Publish to GSV
- Update on GSV
- View on Google
Use this when you want a single 360° panorama to appear on Google Street View.
Before publishing to Google Street View, make sure:
- The panorama is high quality.
- Geo coordinates are accurate.
- The image represents a real physical location.
- You have permission to publish the image.
See Publish 360° Photos to Google Street View for the current single-panorama publishing workflow.
Advanced Controls
The Advanced Controls section contains more detailed viewer behavior settings.
Most users can keep these at their default values.
Zoom Target FOV
Use Zoom Target FOV to control how far the viewer zooms during zoom-in effects.
A lower value zooms in more. A higher value zooms in less.
Typical values:
- 20: stronger zoom
- 30: balanced default
- 40: lighter zoom
This setting can affect transition effects and viewer focus.
Max Tilt Angle
Use Max Tilt Angle (Vertical) to control how far visitors can look up or down.
The default value is typically near 85, which allows broad vertical movement while preventing extreme viewing angles.
A higher value allows visitors to look farther up and down. A lower value limits vertical movement more strongly.
Use this if you want to prevent visitors from looking too far toward the top or bottom of the panorama.
Scene Transition Settings
A transition controls the visual effect when a visitor follows a navigation hotspot to another scene. These settings belong to that individual connection, rather than applying to every scene in the tour. A return connection is separate: changing Bedroom → Hallway does not also change Hallway → Bedroom.
Open a navigation hotspot’s Hotspot Settings to find the Transition controls below its appearance and label settings.
Movement and Speed
The Transition section appears below the label in the Hotspot Settings popup.
| Movement | What visitors see |
|---|---|
| Fade only | A fade between scenes without the added zoom movement. |
| Gentle zoom | A subtle zoom during the scene change. |
| Standard zoom | A more noticeable zoom. |
| Strong zoom | The strongest zoom preset in this selector; the default when no custom transition is saved. |
| Speed | Transition duration |
|---|---|
| Fast | 350 milliseconds |
| Normal | 500 milliseconds; the default |
| Slow | 750 milliseconds |
Movement controls the effect and its intensity; Speed controls how long it runs. Selecting Slow does not increase the zoom strength. These choices do not change the hotspot's destination or replace the destination scene's starting-view settings.
Connections without a saved custom transition use Strong zoom and Normal speed. Editing a hotspot from an account without these controls preserves any existing transition configuration.
Set and Check a Transition
- Open the tour editor and select the scene containing the connection you want to change.
- Open its navigation hotspot's Hotspot Settings, either from the hotspot or its Connected dropdown.
- Choose Movement and Speed in the Transition section.
- Apply the hotspot update, or finish placing the hotspot if you are creating a new connection.
- Save the tour using the appropriate save or publish action.
- Reload the editor and reopen the same connection to check that the selected values were retained.
- Preview the tour and follow that hotspot. Check the return connection separately if you want matching behavior in both directions.
Start with Gentle zoom or Fade only if you prefer less visual movement. Preview on a phone as well as a desktop before choosing stronger effects throughout a tour.
If your selections revert after saving, use the contact form and include the tour URL, source and destination scene names, selected movement and speed, and what happens after reloading. See troubleshooting for other useful details to provide.
For hotspot types, icons, and placement, see Virtual Tour Hotspots: Types and Setup.
Hotspots
Hotspots are interactive points that can show information, open videos, redirect visitors, display webpages, or connect scenes in a virtual tour.
The settings panel may include hotspot options such as:
- Info Hotspot
- Video Hotspot
- Redirect
- Webpage
- Transition Hotspot
Hotspots are documented separately because they involve their own workflow, placement steps, styles, and editing behavior.
Learn more here:
For virtual tour creation steps, including transition scenes and navigation hotspots, see:
For another navigation option, use Add an Interactive Floor Plan to a Virtual Tour. If you are configuring one uploaded image, begin with Configure and Publish a 360° Panorama.
Save, Preview, and Publishing Options
After editing configuration options, save your changes.
Depending on your account type and project state, you may see options such as:
- Save
- Save as Draft
- Save & Publish
- Save as Private
- Preview
Save
Use Save to save your current changes.
Depending on the project status, this may save the current configuration without changing visibility.
Save as Draft
Use Save as Draft when the panorama or tour is not ready to be public.
Draft mode is useful while you are still editing descriptions, thumbnails, hotspots, scene order, AI Chat content, or other settings.
For virtual tours, Free users can build and preview tours in draft mode. Publishing a full virtual tour requires a paid plan.
Save & Publish
PLUS+ feature for virtual tours.
Use Save & Publish when the panorama or tour is ready to be shared publicly.
Publishing makes the content available through its public link.
Before publishing, review:
- Project title
- Description
- Tags
- Initial viewpoint
- Thumbnail
- Camera behavior
- Hotspots
- Scene navigation
- Visibility settings
Save as Private
PLUS+ feature.
Use Save as Private when you want the content saved but not openly public.
Private visibility is useful for internal review, client previews, restricted sharing, or work that should not be publicly listed.
Preview
Use Preview to open and review the panorama or tour before sharing.
Preview helps confirm that:
- The initial view looks correct.
- The thumbnail represents the project well.
- Camera controls feel natural.
- Hotspots work correctly.
- Scene navigation appears as expected.
- AI Chat or other add-ons are ready.
- The public viewing experience looks good on desktop and mobile.
Recommended Setup Checklist
Before sharing or publishing, review the following:
- Add a clear project description.
- Add useful SEO/search tags.
- Set the initial viewpoint.
- Generate a clean thumbnail.
- Confirm auto-rotation behavior.
- Check field of view.
- Add geo coordinates when relevant.
- Validate AI readiness if using AI Chat.
- Preview the experience.
- Save as draft, private, or publish based on your goal.
Need Help?
If you encounter issues while configuring your panorama or virtual tour, contact the 360are support team:
Start creating and sharing immersive 360° experiences with 360are.