
Interactive Floor Plans for Virtual Tours
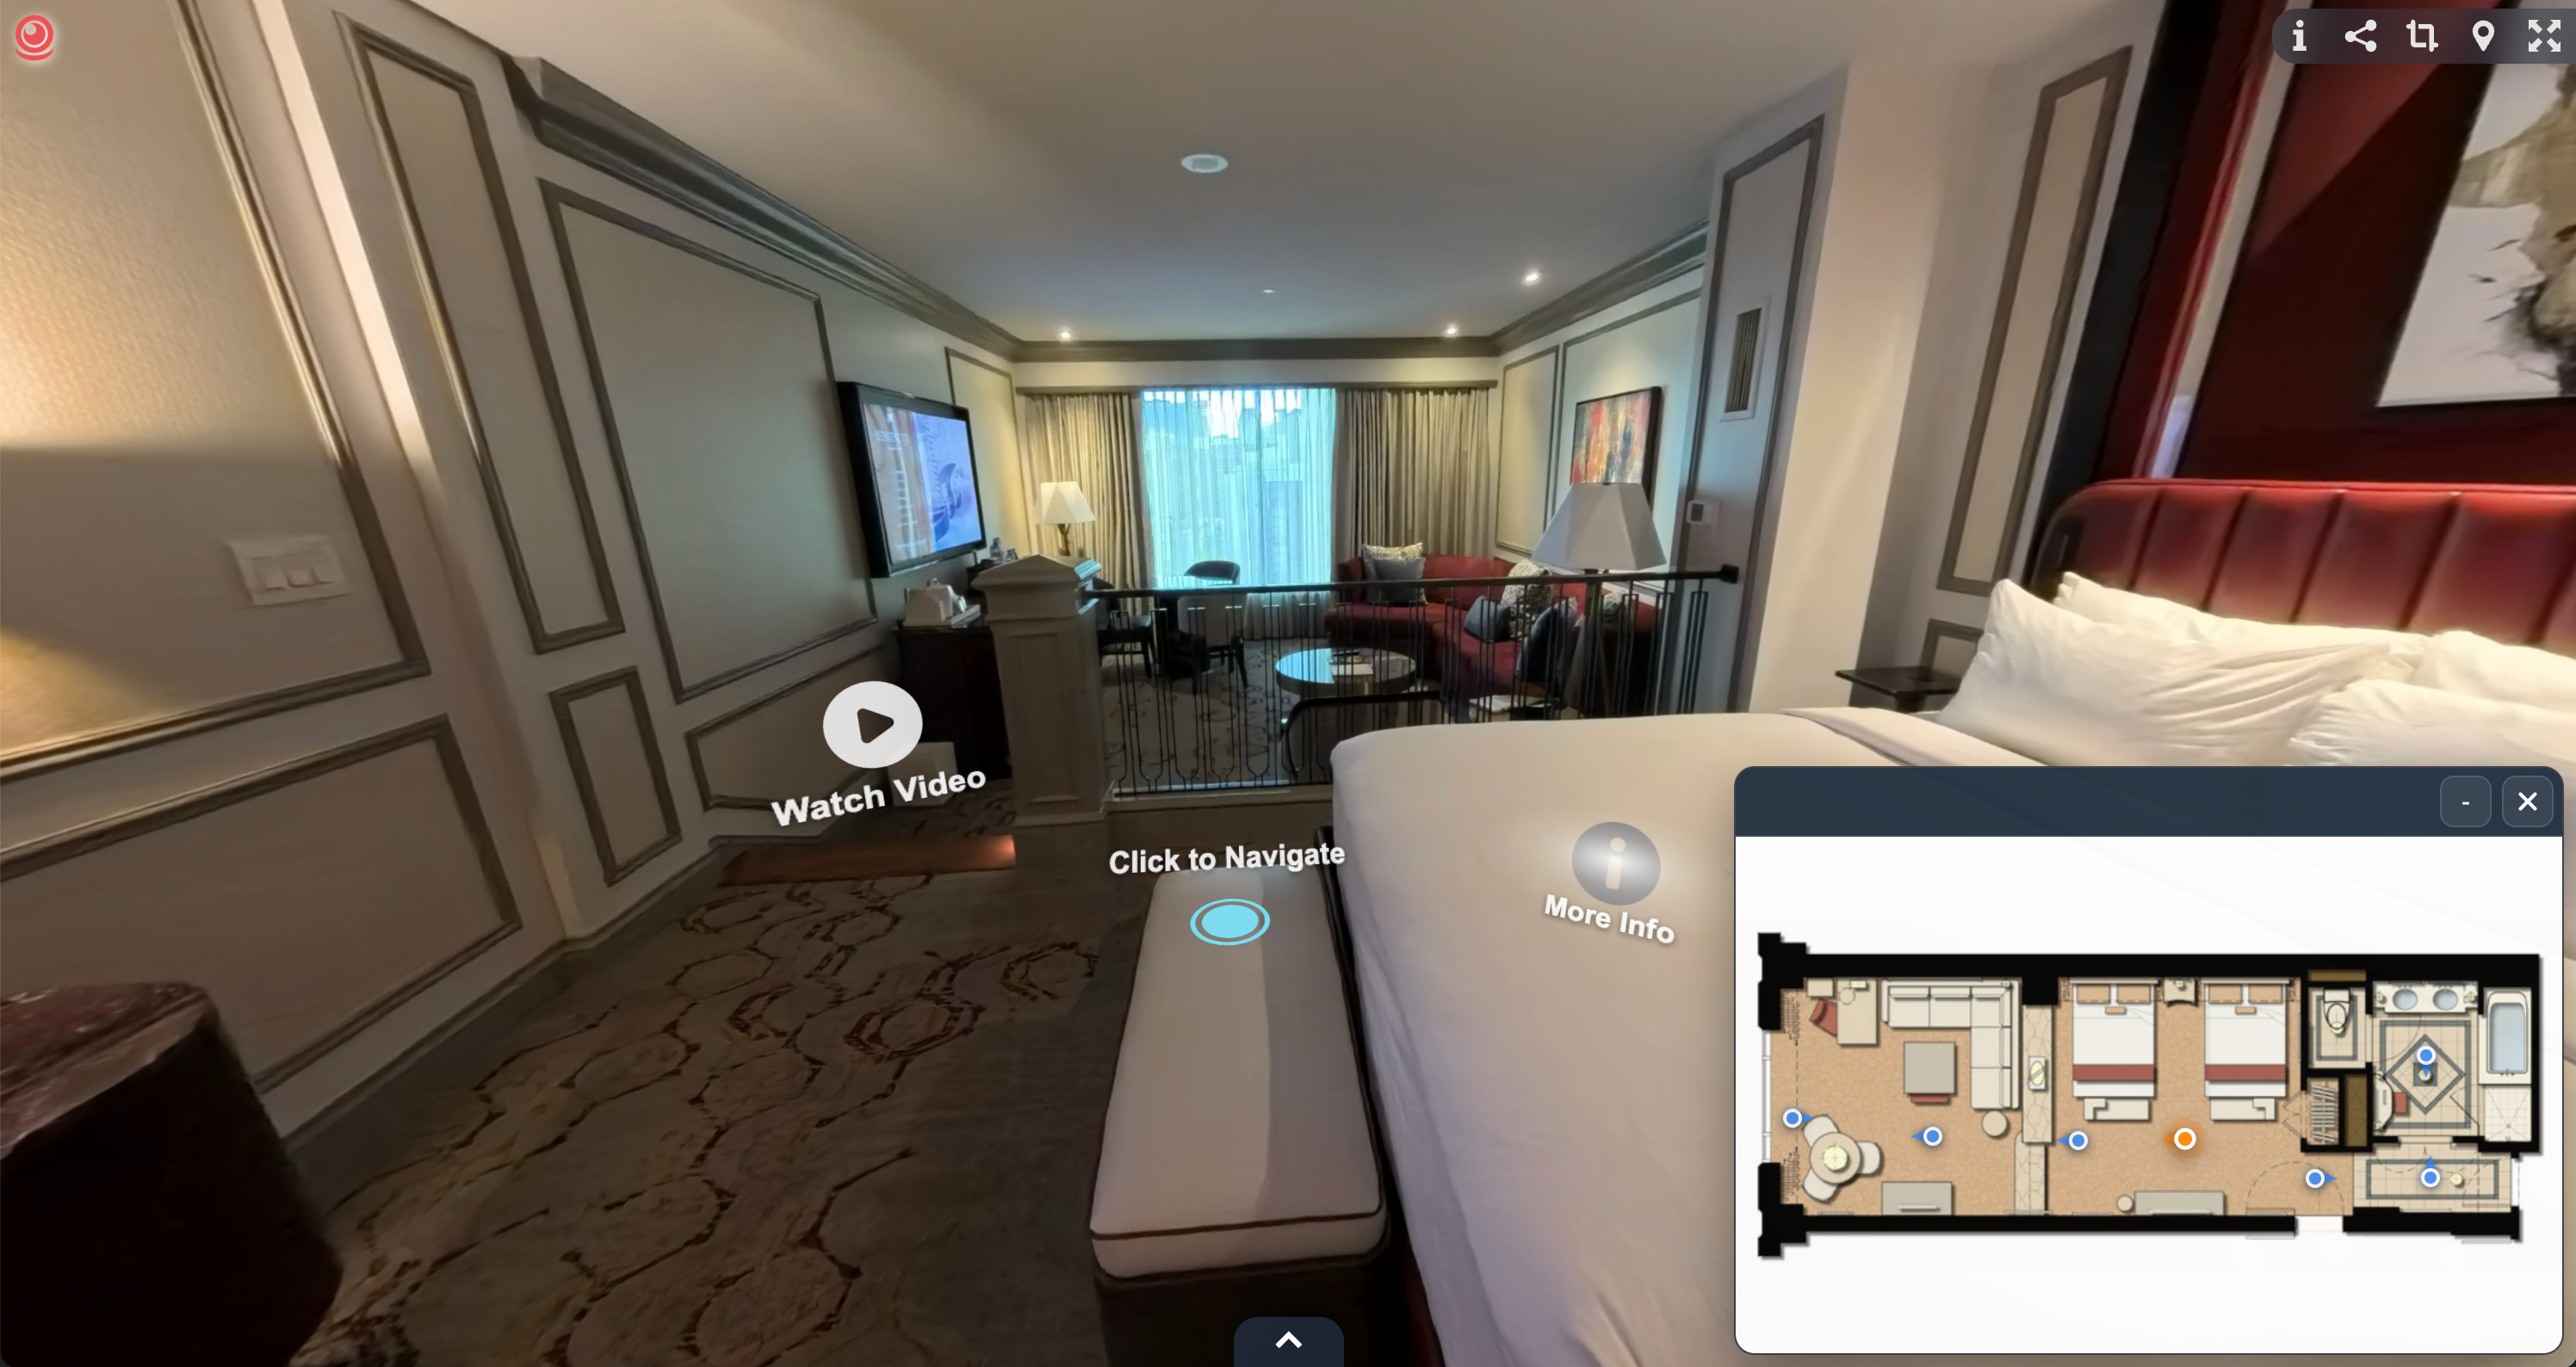
Interactive Floor Maps provide visitors with an intuitive way to navigate a virtual tour by displaying every panoramic scene on a visual floor plan. Rather than relying only on hotspots or scene lists, visitors can instantly understand how rooms connect and jump directly to the area they wish to explore.
For residential properties, hotels, museums, offices, schools, and commercial buildings, a floor plan often makes navigation significantly easier.
Availability: Interactive Floor Maps are available on the BUSINESS plan. See current plan availability.
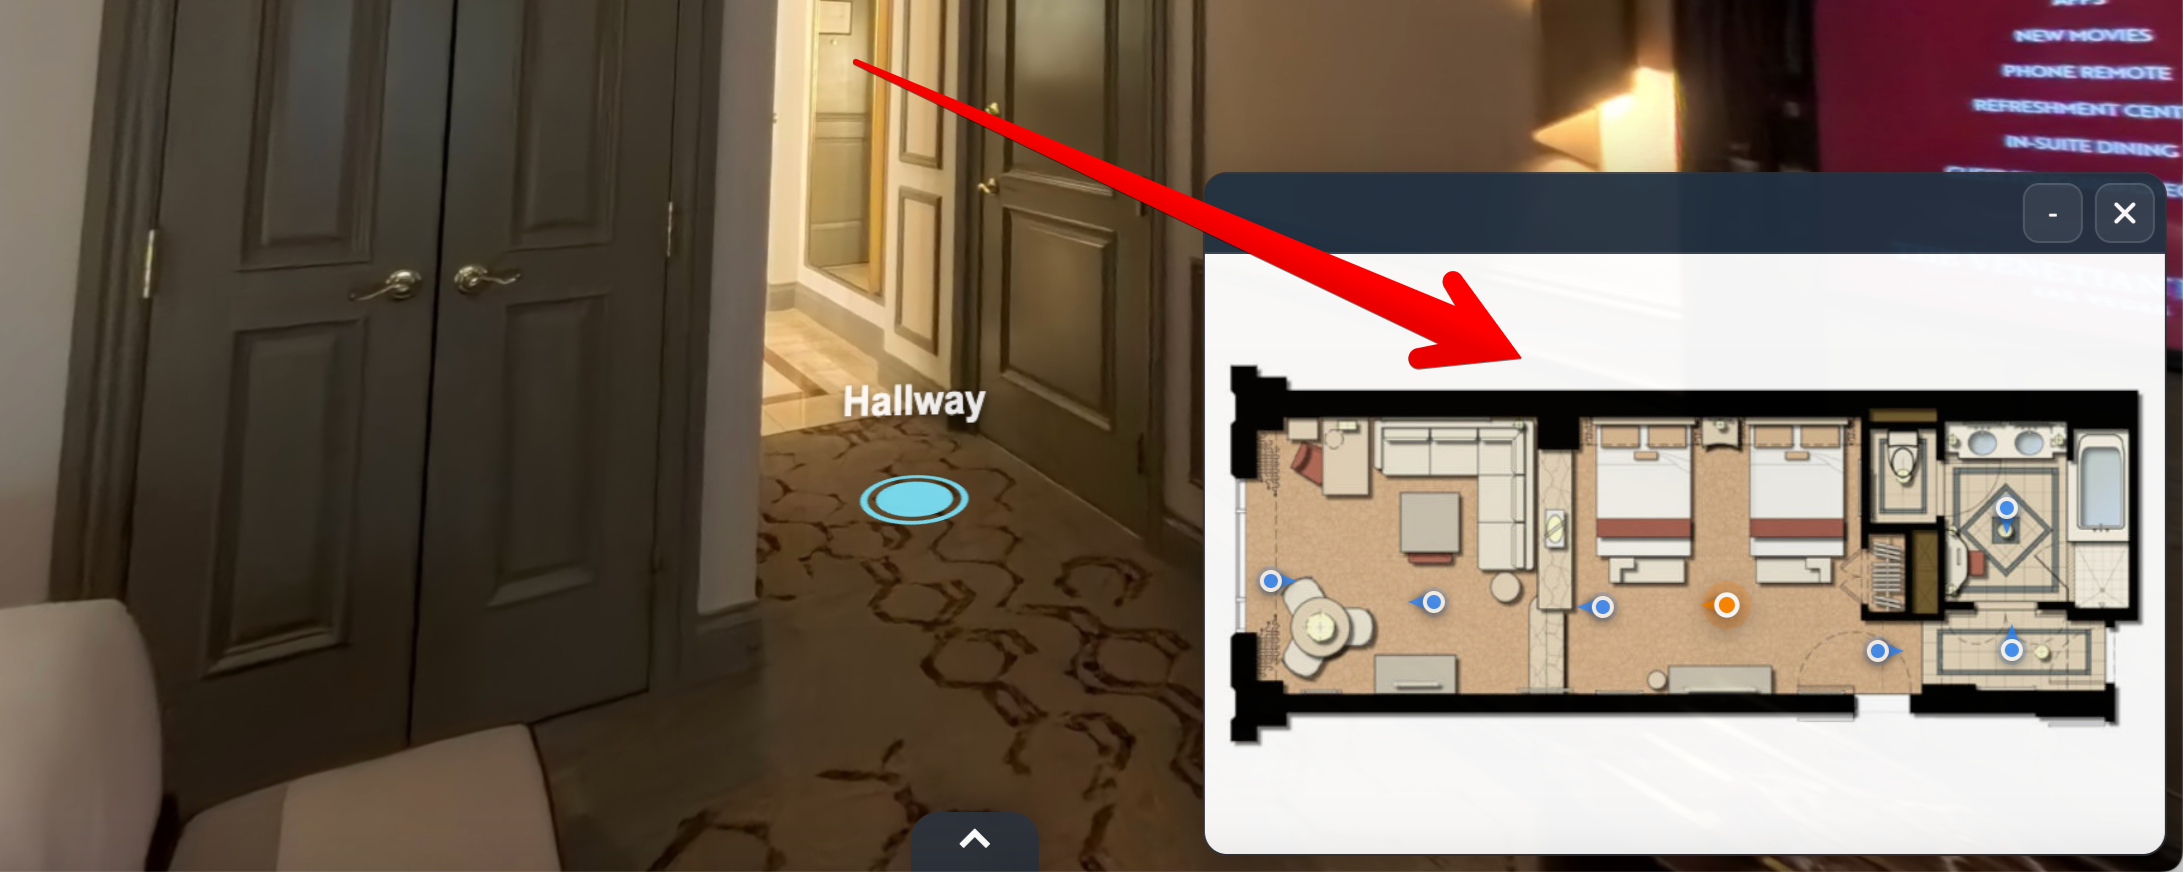
This feature uses a floor-plan image that you provide. It does not generate a measured floor plan or a 3D dollhouse from your panoramic photos.
Why use a Floor Map?
Traditional hotspot navigation works well for small tours but becomes increasingly difficult as projects grow.
An Interactive Floor Map solves this by giving visitors a familiar architectural layout that shows exactly where each panorama belongs.
Benefits include:
- Better understanding of the property's layout
- Faster movement between rooms
- Reduced visitor confusion
- Professional presentation
- Improved user engagement
- Easier navigation on desktop and mobile
Typical use cases include:
- Residential real estate
- Apartment complexes
- Hotels
- Resorts
- Office buildings
- Schools
- Universities
- Museums
- Healthcare facilities
- Construction documentation
Build and name your scenes using How to Create a Virtual Tour in 360are first. Keep Virtual Tour Hotspots: Types and Setup available for room-to-room navigation.
Opening the Floor Map Editor
Navigate to:
Settings → Advanced Controls → Interactive Floor Map
Select Open Floor Map Editor.
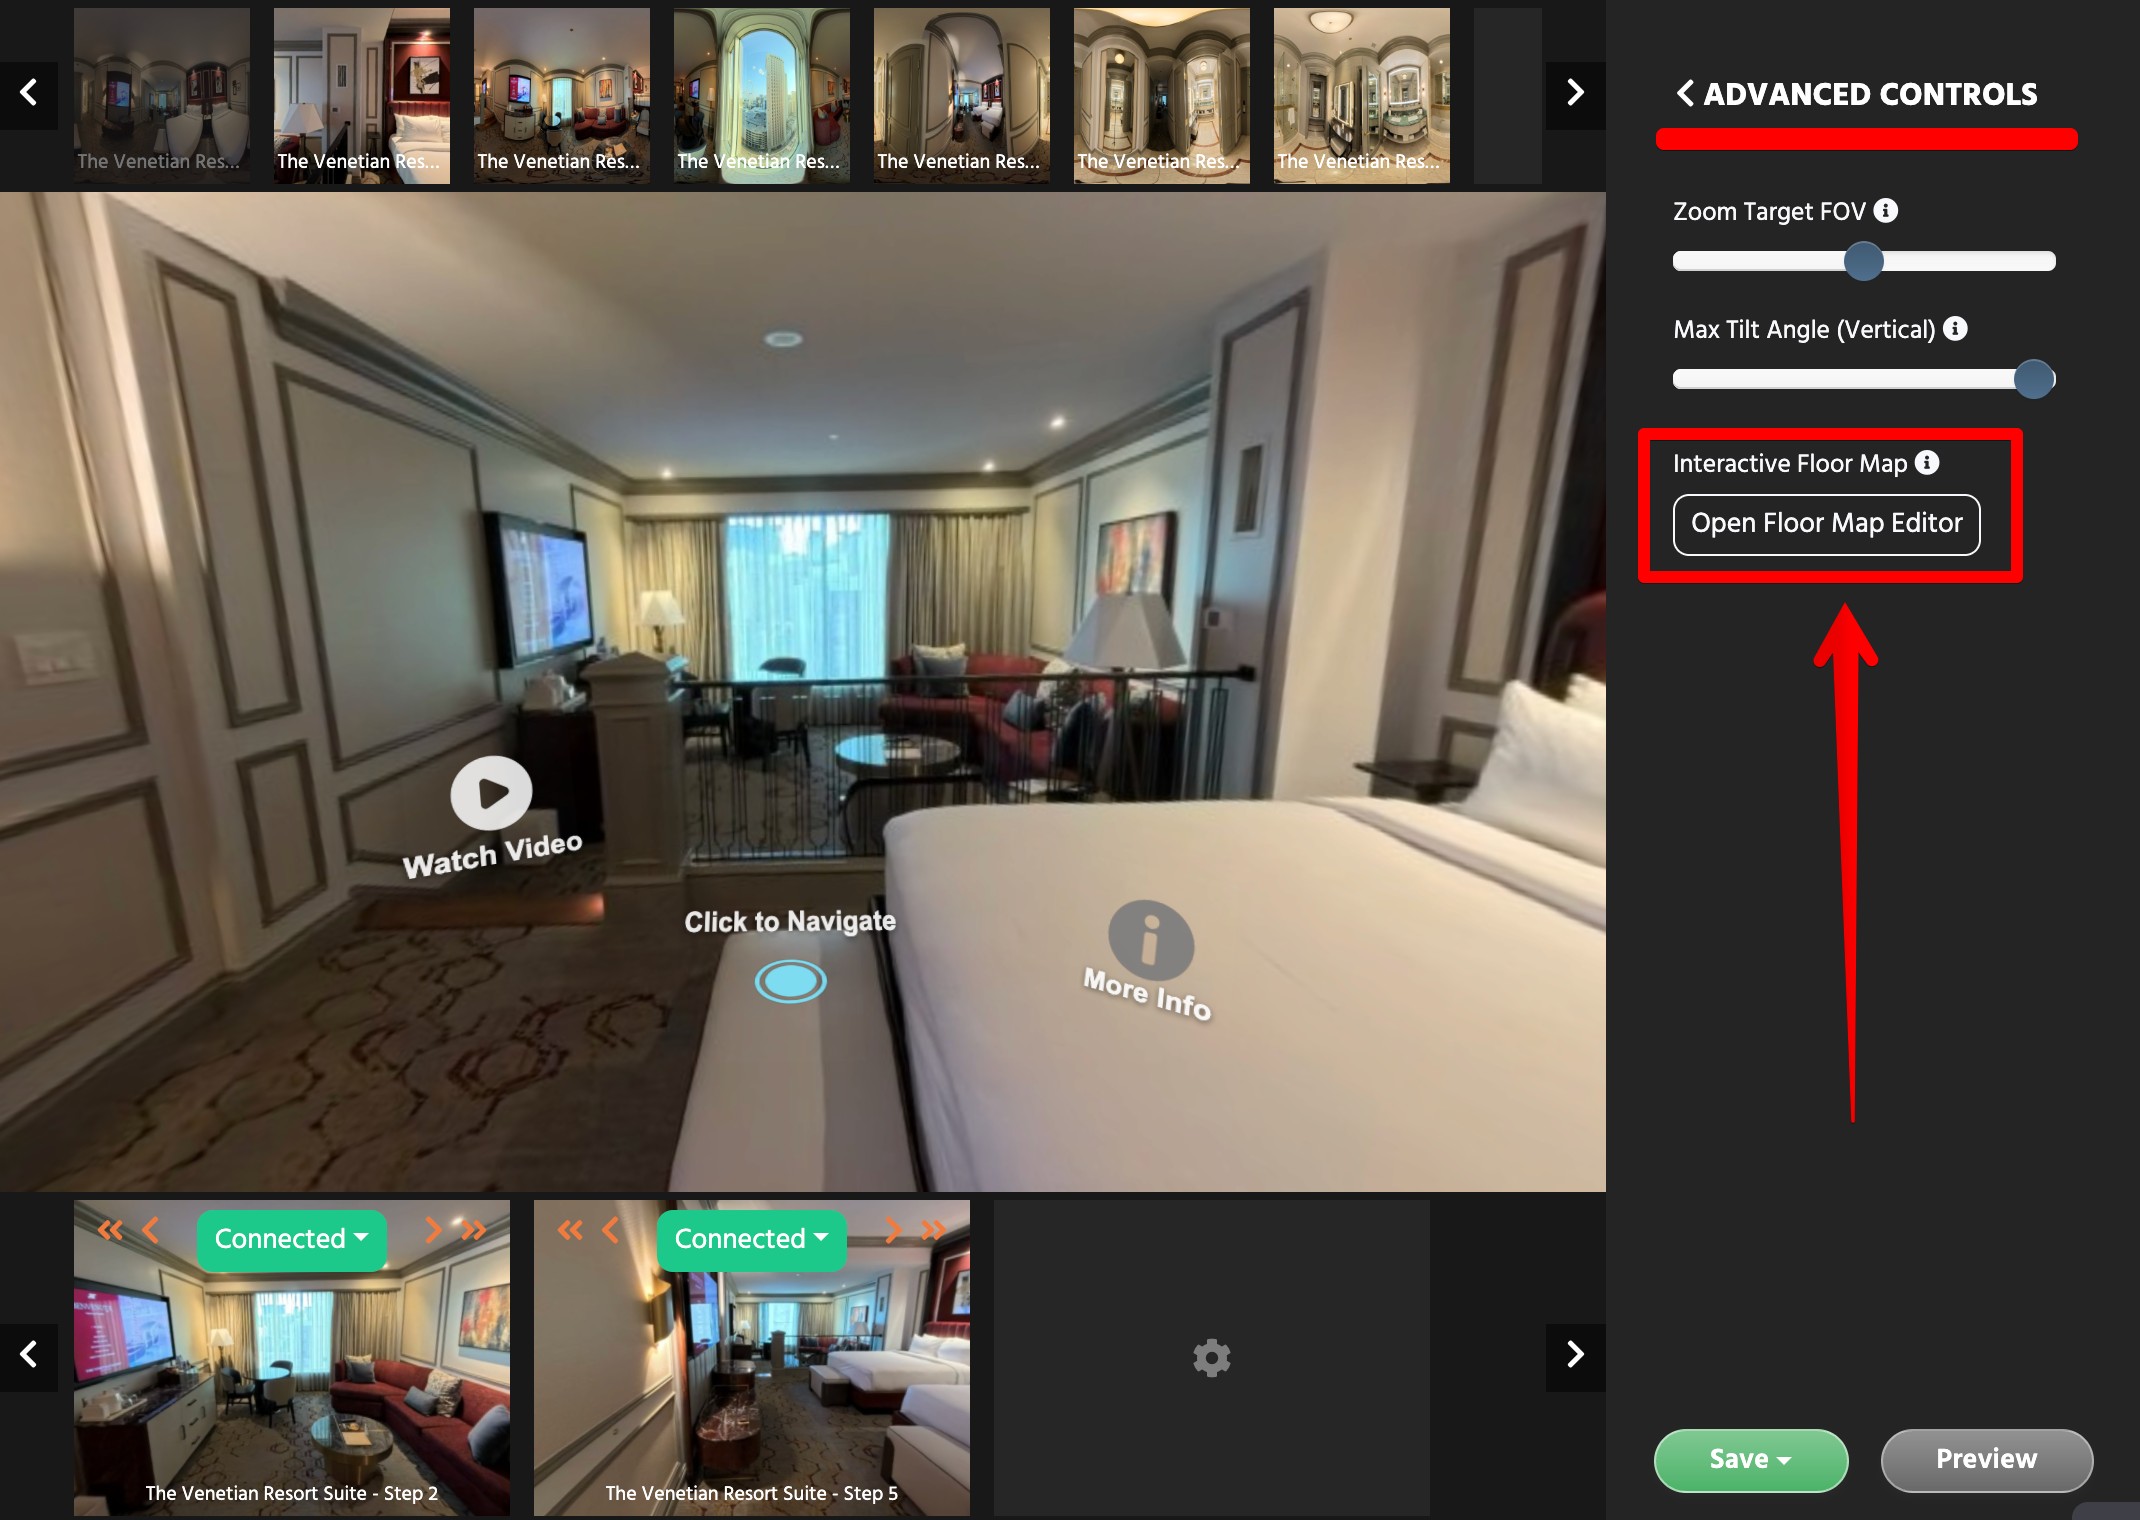
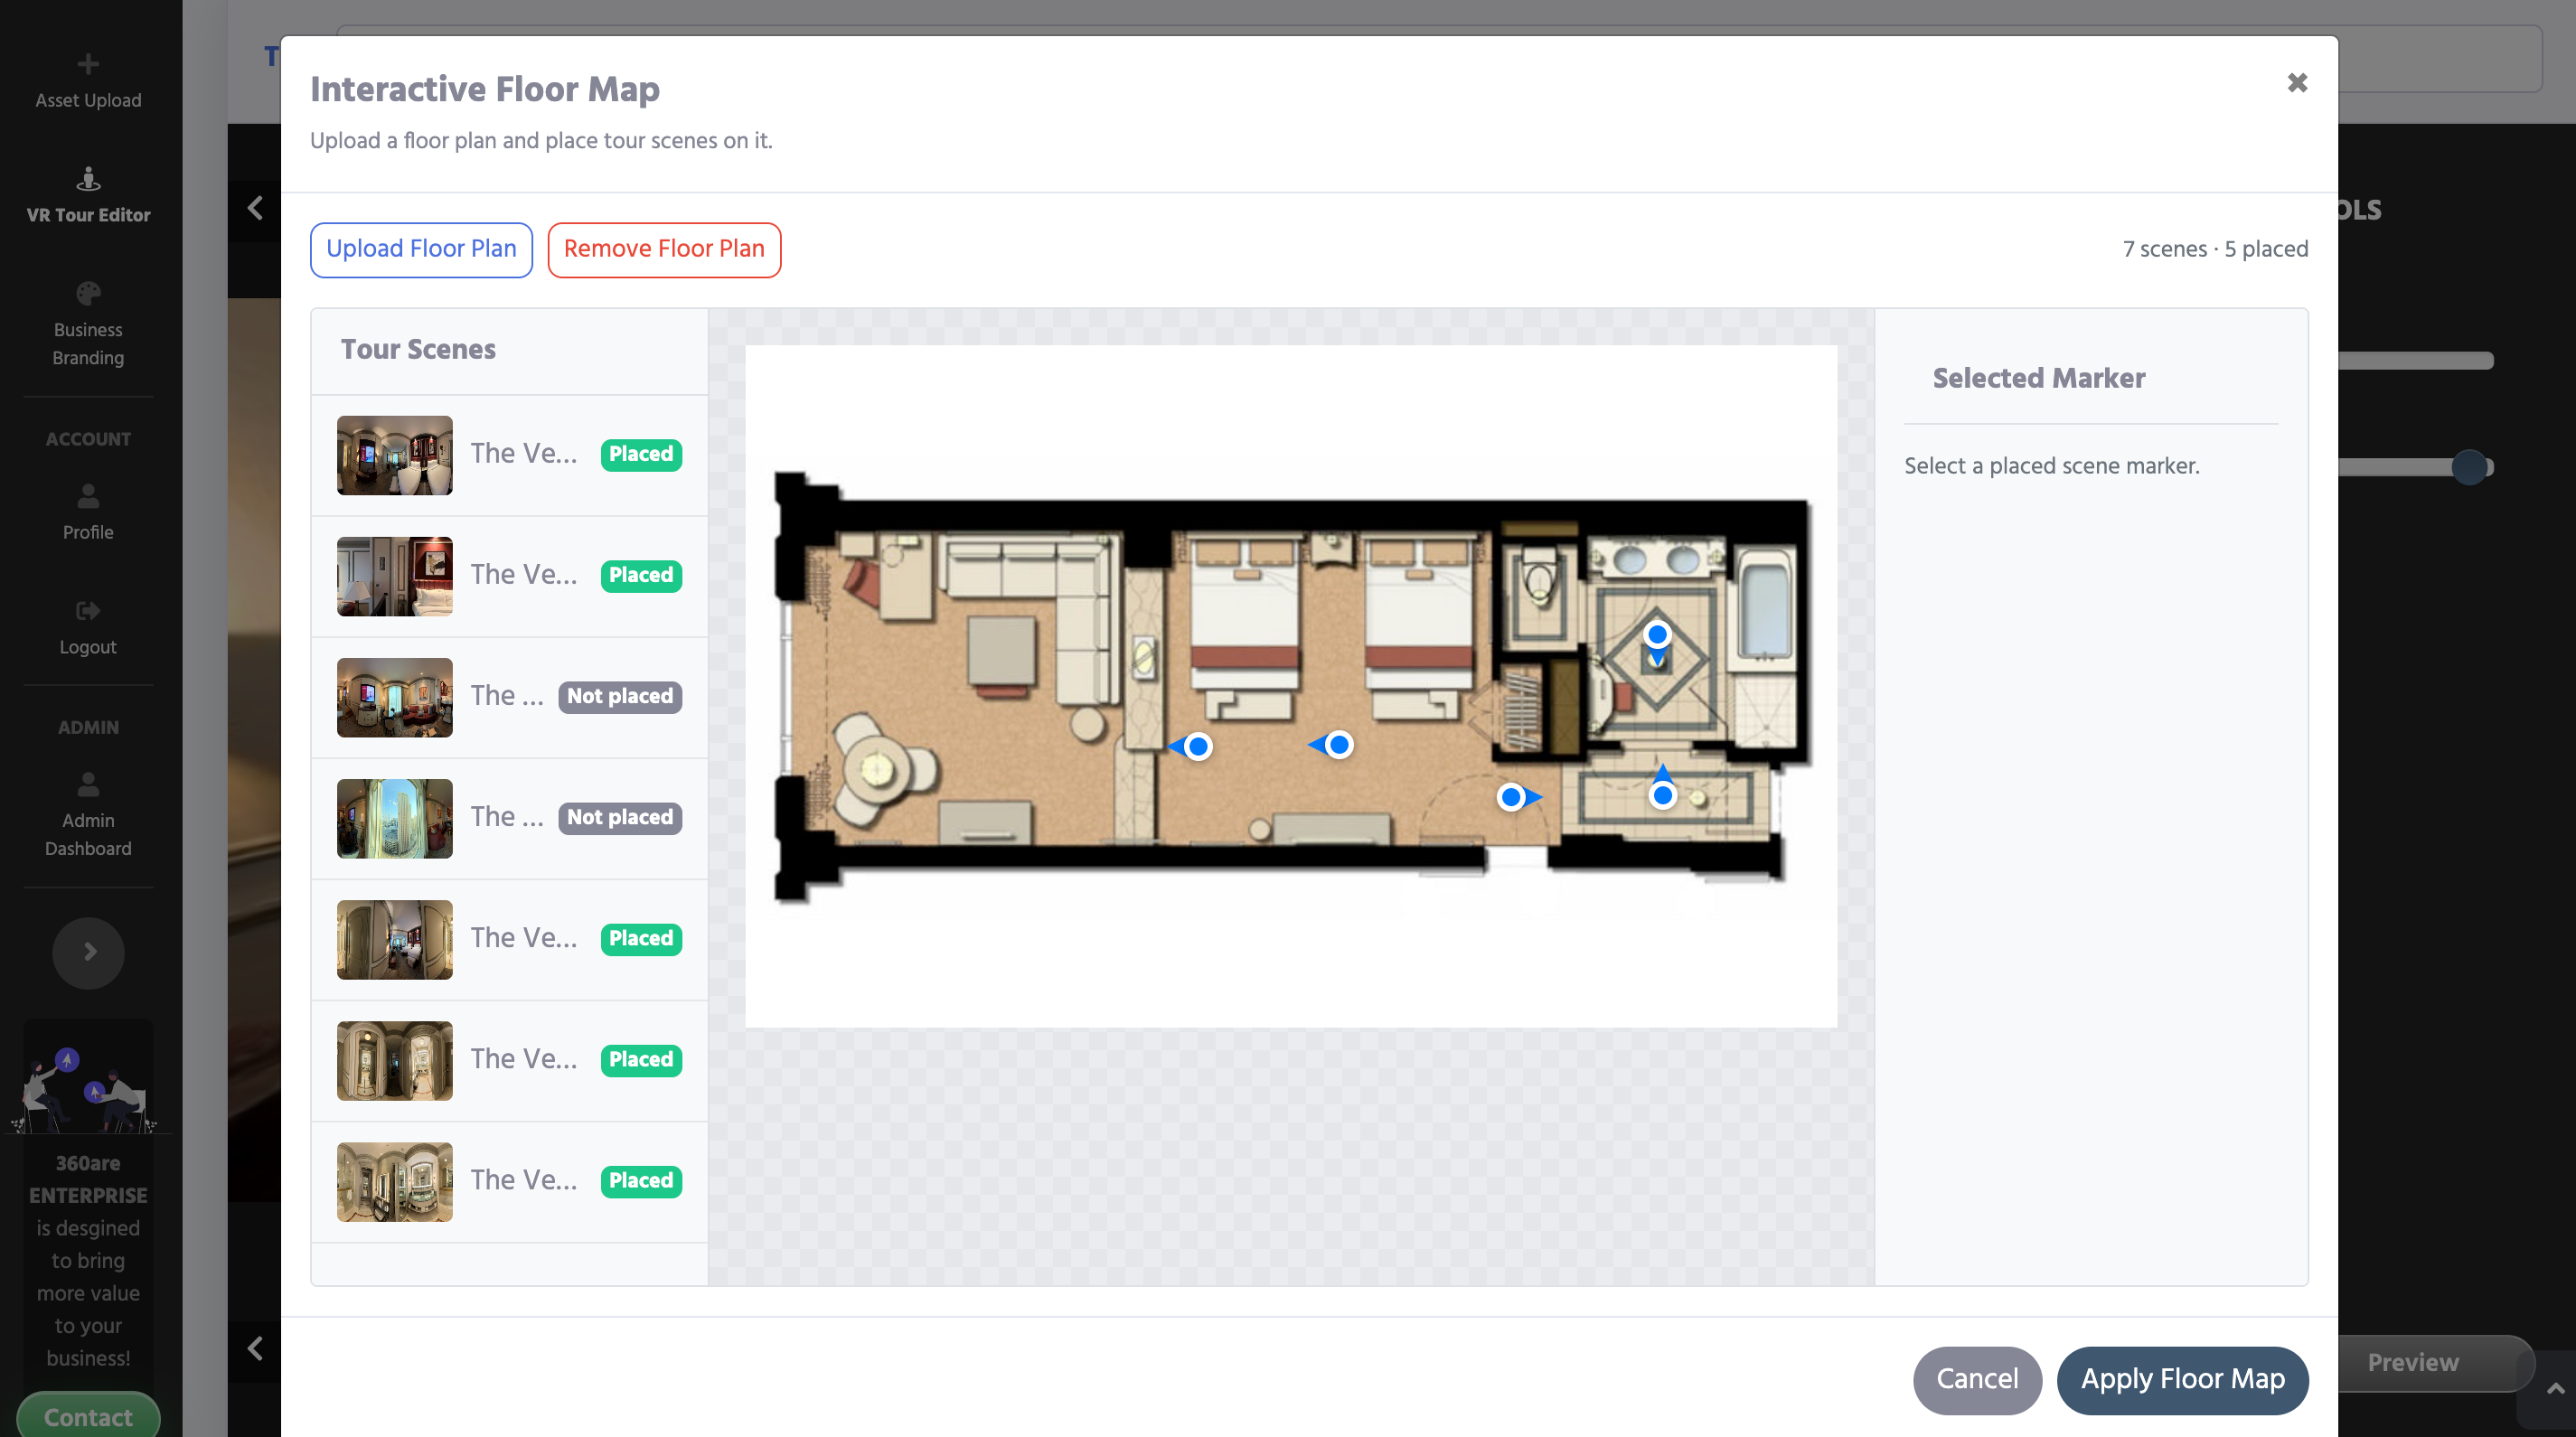
The editor opens in a dedicated workspace containing:
- Floor plan upload area
- Scene list
- Interactive map
- Marker properties
- Rotation controls
- Apply button
Uploading a Floor Plan
Supported formats:
- PNG
- JPG
- JPEG
- WEBP
Maximum upload size:
10 MB
For best results:
- Use a clean architectural drawing.
- Remove unnecessary borders.
- Ensure room names remain readable.
- Use high resolution.
- Keep the floor plan upright.
After uploading, the image immediately becomes the editing surface.
Understanding the Scene List
Every panorama appears in the scene list.
Each entry displays:
- Scene thumbnail
- Scene title
- Placement status
Status values:
- Placed
- Not Placed
This makes it easy to identify scenes that still need positioning.
Placing Scene Markers
To position a scene:
- Select a scene.
- Click the desired location on the floor plan.
- A marker is automatically created.
Marker positions are stored as percentage coordinates instead of pixels.
Because percentages are stored, markers remain correctly positioned regardless of screen size.
Dragging Markers
Markers are fully draggable.
Simply:
- Click and hold the marker.
- Drag it.
- Release.
The editor automatically constrains markers to the floor plan boundaries.
Dragging can be repeated as many times as necessary before saving.
Rotating Marker Direction
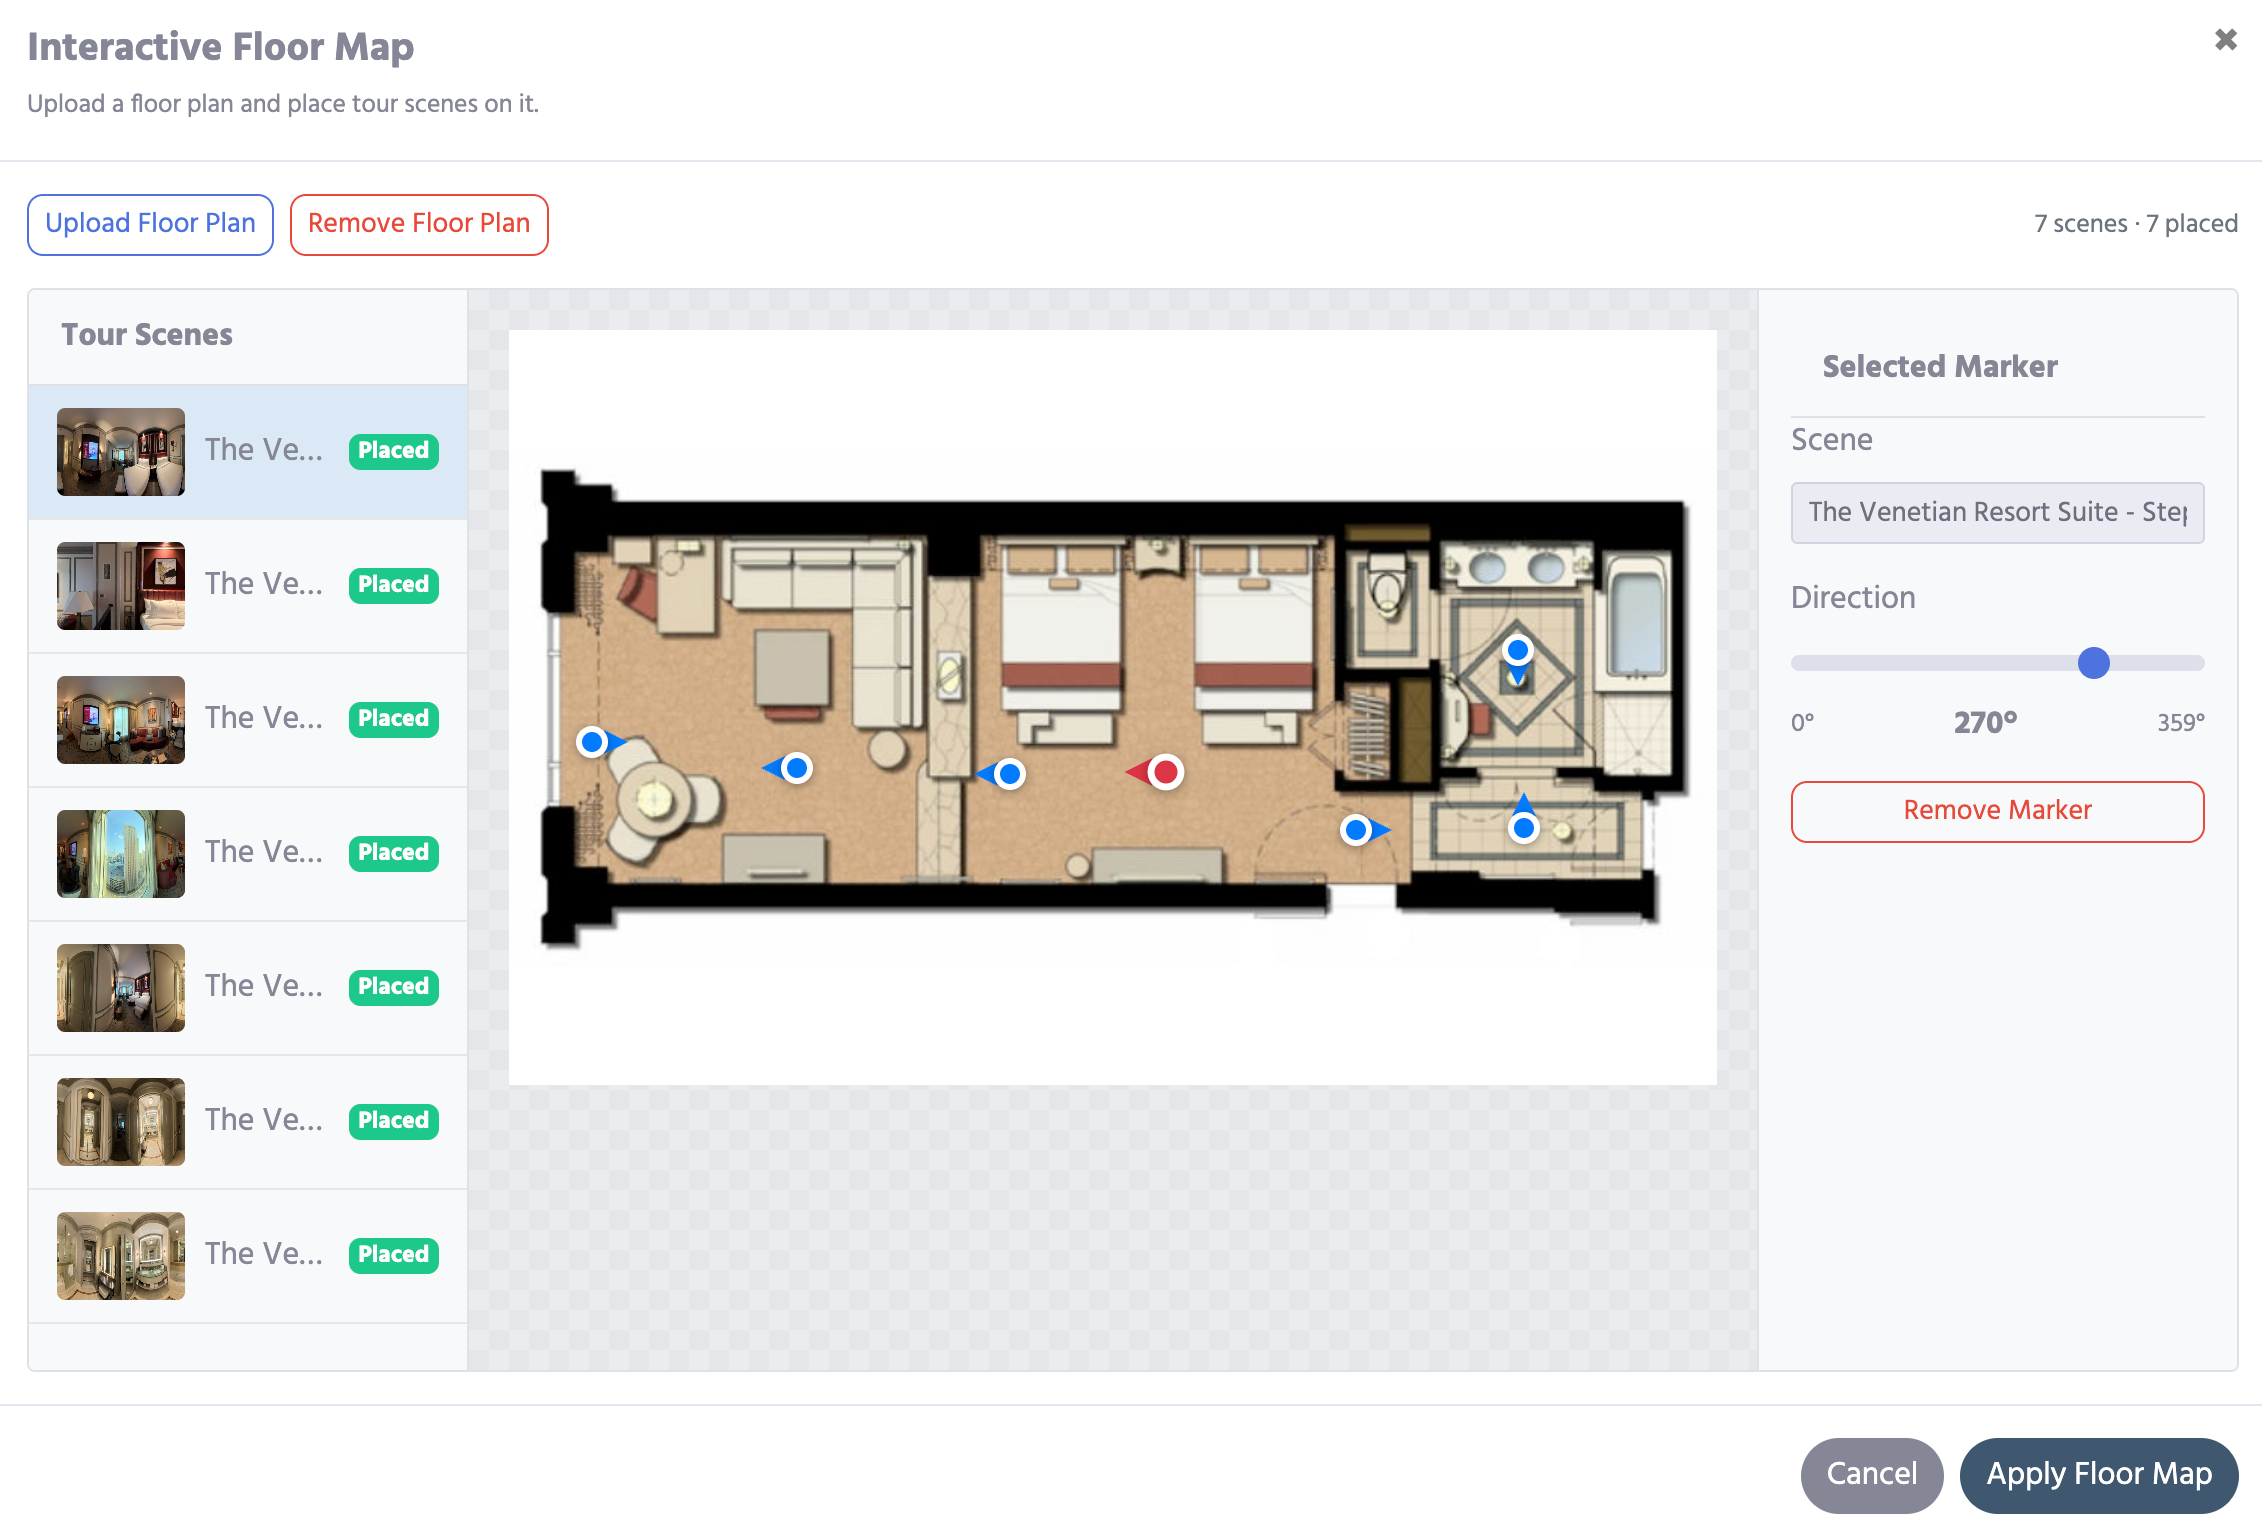
Every marker includes a directional arrow representing the camera's initial viewing direction.
Use the Rotation slider after selecting a marker.
| Rotation | Direction |
|---|---|
| 0° | Up |
| 90° | Right |
| 180° | Down |
| 270° | Left |
Intermediate values provide diagonal directions.
For consistency, align the arrow with the initial panorama view rather than the direction a visitor might eventually walk.
Removing Markers
If a marker was placed incorrectly:
- Select it.
- Click Remove Marker.
Only the floor map location is removed.
The panorama itself remains part of the virtual tour.
Replacing or Removing the Floor Plan
A floor plan can be replaced at any time.
Removing it also removes every stored marker position.
Panoramas remain untouched.
After uploading a replacement image, simply reposition the markers.
Applying Changes
The editor maintains a temporary editing state while you work.
Selecting Apply copies the floor plan and marker coordinates into the virtual tour configuration.
Remember that Apply does not publish the tour.
After applying:
- Close the editor.
- Save the virtual tour.
- Publish if desired.
See Virtual Tour and Panorama Settings for saving, previewing, and publishing the finished tour.
Visitor Experience
Once published, visitors can open the Interactive Floor Map.
Selecting a marker immediately loads its associated panorama.
The currently active panorama marker is highlighted, making it easy to understand the visitor's location inside the building.
Best Practices
Place markers where the camera stood
Markers should represent the actual camera position instead of the center of the room.
Avoid overlapping markers
If multiple panoramas are close together, separate them slightly while preserving their relative location.
Use descriptive scene names
Examples:
- Reception
- Kitchen
- Bedroom 1
- Main Hall
- Conference Room
Keep rotation consistent
Rotate every marker according to the panorama's initial direction.
Test before publishing
Verify:
- Marker placement
- Marker direction
- Scene links
- Mobile responsiveness
Troubleshooting
Floor plan does not appear
Verify the image uploaded successfully and save the tour after applying.
Marker opens the wrong panorama
Delete the marker and recreate it while the correct scene is selected.
Marker direction feels incorrect
Adjust the rotation slider.
Changes disappeared
The correct workflow is:
- Upload
- Place markers
- Apply
- Save tour
Frequently Asked Questions
Can every panorama have a marker?
Yes.
Can I move markers later?
Yes. Markers remain editable until removed.
Can I replace the floor plan?
Yes.
Are coordinates responsive?
Yes. Coordinates are stored as percentages.
Which plans include this feature?
The BUSINESS plan includes interactive floor plans. See current plans for availability.
Does removing a marker delete the panorama?
No. It only removes the floor map location.
Can visitors navigate entirely from the floor plan?
Yes. Selecting any marker loads the connected panorama.
Tips
- Use a clean, uncluttered floor plan.
- Keep room labels readable.
- Verify every marker before publishing.
- Rotate arrows consistently.
- Revisit the floor map whenever new scenes are added.
Conclusion
Interactive Floor Maps transform a virtual tour into a far more intuitive experience by connecting panoramic scenes to a recognizable architectural layout. Visitors immediately understand where they are, how rooms connect, and how to move throughout the property.
For medium and large virtual tours, an Interactive Floor Map is one of the most valuable navigation features available in 360are.